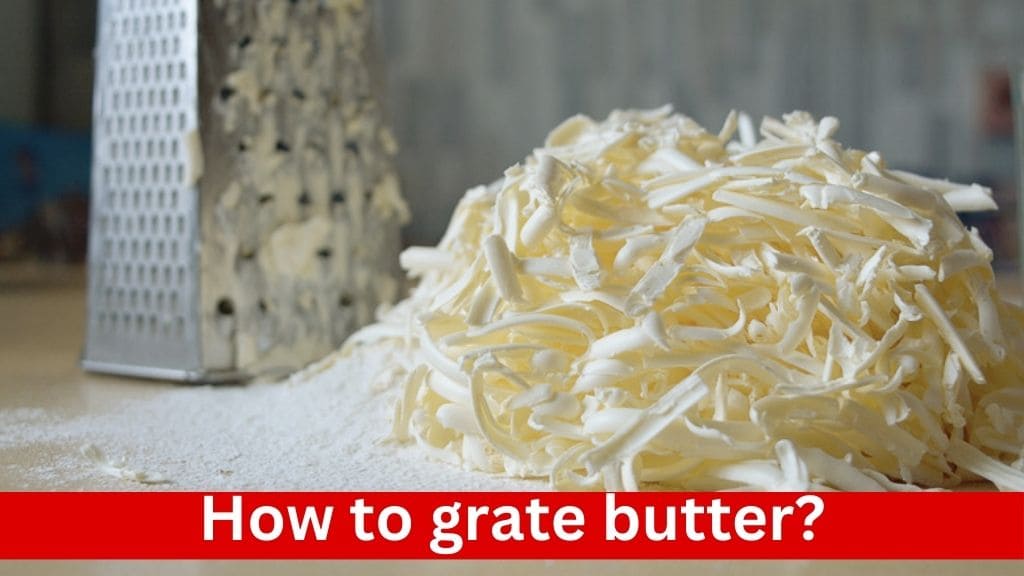
In the world of baking, precision and technique often make all the difference between a mediocre result and a masterpiece. One such technique that has been gaining popularity among bakers is grating butter. Grating butter offers numerous advantages over traditional methods of incorporating butter into baked goods, from ensuring even distribution to achieving the perfect texture. In this comprehensive guide, we’ll delve into everything you need to know about how to grate butter effectively for baking success.
Why Grate Butter?
1. Enhanced Incorporation and Distribution
Grating butter creates fine, uniform shreds that blend seamlessly with dry ingredients. Unlike traditional methods where butter is cut into chunks, grated butter disperses evenly throughout the dough or batter. This ensures that every bite of your baked goods contains a consistent amount of butter, resulting in uniform texture, flavor, and moisture distribution.
2. Improved Texture and Consistency
The fine texture of grated butter allows it to integrate more thoroughly into the dough without creating large pockets or clumps. This leads to a smoother, more cohesive texture in the final product. Whether you’re making flaky pie crusts, tender biscuits, or delicate pastries, grated butter helps achieve the desired texture and consistency with ease.
3. Faster Mixing and Incorporation
Grated butter blends more quickly and easily into the dry ingredients compared to solid chunks of butter. This speeds up the mixing process and reduces the risk of overworking the dough, which can result in tough or dense baked goods. With grated butter, you can achieve optimal incorporation with minimal effort, saving both time and energy in the baking process.
4. Enhanced Flakiness and Tenderness
In recipes where flakiness and tenderness are desired, such as pie crusts and scones, grated butter is an excellent choice. The fine shreds of butter create layers within the dough, which puff up during baking to create a light and flaky texture. Additionally, the even distribution of butter helps prevent dry or dense spots, resulting in tender and melt-in-your-mouth baked goods.
5. Versatility and Adaptability
Grated butter can be easily customized to suit different recipes and preferences. Depending on the desired outcome, you can adjust the size and texture of the grated butter by using different sides of the grater. Fine shreds work well for delicate pastries, while larger shreds may be preferable for rustic biscuits or streusel toppings. This versatility makes grated butter a valuable tool for bakers of all skill levels.
How to Grate Butter
1. Selecting the Right Butter
Choosing the appropriate butter is crucial for successful grating. Opt for cold, unsalted butter straight from the refrigerator. Cold butter is firmer and easier to grate, resulting in finer shreds that blend seamlessly into the dough or batter. Avoid using softened or room temperature butter, as it will be too soft to grate effectively and may result in a greasy texture.
2. Choosing the Right Tool
Invest in a high-quality box grater or cheese grater with small, fine grating holes. These types of graters produce finer shreds of butter, ensuring even distribution and smooth incorporation into the dry ingredients. Avoid using graters with large shredding holes, as they may produce uneven chunks of butter rather than fine shreds.
3. Preparing the Butter
Before grating the butter, unwrap it from its packaging and, if necessary, cut it into smaller chunks to make the grating process more manageable. Working with smaller pieces of butter helps ensure even grating and prevents the butter from becoming too soft during the process.
4. Grating the Butter
Hold the box grater or cheese grater firmly with one hand, ensuring it is stable on a flat surface. With the other hand, grasp the stick of butter and rub it against the grater using a downward motion. Apply gentle pressure to ensure even grating, and rotate the butter as needed to grate all sides.
5. Handling with Care
As you near the end of the butter stick, exercise caution to avoid scraping your fingers against the grater. To prevent waste and ensure safety, discard any small remnants of butter that are too difficult to grate. Alternatively, you can use a butter knife or vegetable peeler to finish off the butter and minimize waste.
6. Storing or Using Immediately
Once the butter is grated, you can either use it immediately in your recipe or store it for future use. If storing, transfer the grated butter to an airtight container or wrap it tightly in plastic wrap and place it in the refrigerator or freezer until ready to use. Grated butter can be stored for several days in the refrigerator or several months in the freezer, making it a convenient option for meal prep or batch baking.
Tips for Success
1. Keep it Cold
Ensure that the butter remains cold throughout the grating process. Cold butter is firmer and easier to grate, resulting in finer shreds that blend seamlessly into the dough or batter. If the butter starts to soften too much during grating, place it back in the refrigerator for a few minutes to firm up before continuing.
2. Grate in Batches
If you’re grating a large quantity of butter, consider grating it in smaller batches to prevent overcrowding the grater. Overcrowding can make it difficult to achieve even grating and may result in uneven shreds. By grating in batches, you can ensure consistent results and maintain control over the process.
3. Use the Right Technique
Apply firm, even pressure while grating the butter to produce uniform shreds. Avoid pressing too hard, as this may cause the butter to stick to the grater or result in uneven shreds. Use smooth, downward strokes to grate the butter, and rotate the butter as needed to grate all sides evenly.
4. Experiment with Texture
Depending on your recipe and personal preference, you can adjust the texture of the grated butter by using different sides of the grater. For finer texture, use the smaller grating holes; for larger, more rustic pieces, use the larger shredding holes. Experiment with different textures to see which works best for your specific baking needs.
5. Clean the Grater Promptly
After grating the butter, promptly clean the grater to prevent any residual butter from hardening and clogging the grating holes. Use a brush or sponge to remove any butter particles, and wash the grater with warm, soapy water. Cleaning the grater immediately after use will help prolong its lifespan and ensure optimal performance for future use.
6. Store Grated Butter Properly
If you’re not using the grated butter immediately, store it properly to maintain freshness and prevent it from drying out. Transfer the grated butter to an airtight container or wrap it tightly in plastic wrap, and store it in the refrigerator or freezer until ready to use. Proper storage will help preserve the quality of the grated butter and ensure it’s ready whenever you need it for baking.
Incorporating Grated Butter into Recipes
:max_bytes(150000):strip_icc()/soften-butter-grater-9010f4811942413282ff5468bc2df051.jpg)
1. Scones:
Incorporating grated butter into scone dough is a fantastic way to achieve a tender, flaky texture. Start by mixing the grated butter with the dry ingredients, such as flour, sugar, baking powder, and salt. Use your fingertips or a pastry cutter to blend the grated butter into the dry ingredients until it resembles coarse crumbs. Then, add any additional ingredients, such as dried fruit or nuts, and gently mix in the liquid ingredients, such as milk or buttermilk, just until the dough comes together. Be careful not to overmix, as this can result in tough scones. Shape the dough into rounds or triangles, brush the tops with cream or egg wash, and bake until golden brown.
2. Pie Crust:
Grated butter is an excellent choice for making flaky pie crusts. Begin by mixing the grated butter with the flour and salt until the mixture resembles coarse crumbs. Add cold water, a little at a time, and gently mix until the dough comes together. Be careful not to overwork the dough, as this can lead to a tough crust. Divide the dough into two equal portions, shape into disks, wrap in plastic wrap, and refrigerate for at least 30 minutes before rolling out and using to line a pie dish. Fill with your favorite pie filling and bake according to the recipe instructions.
3. Biscuits:
Grated butter adds a light, airy texture to biscuits, making them tender and delicious. Start by mixing the grated butter with the dry ingredients, such as flour, baking powder, baking soda, and salt. Use your fingertips or a pastry cutter to blend the grated butter into the dry ingredients until it resembles coarse crumbs. Add any additional ingredients, such as cheese or herbs, and gently mix in the liquid ingredients, such as milk or buttermilk, just until the dough comes together. Drop spoonfuls of dough onto a baking sheet and bake until golden brown.
4. Muffins:
Grated butter can be incorporated into muffin batter to add moisture and flavor. Begin by mixing the grated butter with the dry ingredients, such as flour, sugar, baking powder, and salt. Use your fingertips or a pastry cutter to blend the grated butter into the dry ingredients until it resembles coarse crumbs. In a separate bowl, whisk together the liquid ingredients, such as eggs, milk, and vanilla extract. Gently fold the wet ingredients into the dry ingredients until just combined. Be careful not to overmix, as this can result in tough muffins. Spoon the batter into muffin cups and bake until a toothpick inserted into the center comes out clean.
5. Cookies:
Grated butter can be incorporated into cookie dough to add richness and flavor. Start by mixing the grated butter with the sugar until light and fluffy. Add the eggs and vanilla extract and mix until well combined. In a separate bowl, whisk together the dry ingredients, such as flour, baking soda, and salt. Gradually add the dry ingredients to the wet ingredients and mix until a dough forms. Fold in any additional ingredients, such as chocolate chips or nuts, and drop spoonfuls of dough onto a baking sheet. Bake until golden brown around the edges.
Conclusion
Grating butter is a simple yet effective technique that can elevate your baking to new heights. Whether you’re making scones, pie crust, biscuits, or cookies, incorporating grated butter into your recipes can result in lighter, flakier, and more tender baked goods. With the right tools, technique, and tips for success, you’ll be well on your way to becoming a master baker in no time. So grab your box grater, stock up on cold butter, and start grating your way to baking perfection!